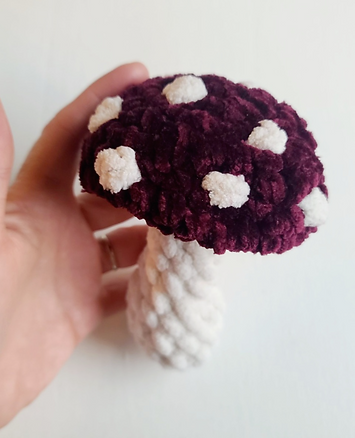
Shrooming Around
One of my first patterns designed was meant to be shared by others as a freebie! I know that in the beginning of my crochet journey, I have came across many free patterns that helped build my skill! I wanted to give back to the fiber art community by offering my Shrooming Around pattern for free!
With cottage core booming, I felt a plush shroom would fit right along with the trend. It speaks to so many of us as we all search for that inner peace found within nature!
This pattern is one continuous piece that makes it perfect for all levels of crochet.
**NOTE**
Although I am offering this pattern for free, I own the rights.
2023 WeirUnique/ All rights reserved. This pattern, or any parts of it, may not be reproduced or transmitted in any form or by any means. Duplication, alteration or sharing is strictly prohibited.
Providing free material takes time and resources, and in order for me to continue to provide content for others, my patterns are to be used for personal use only. This post contains affiliate links that leads you to my go-to materials for this pattern. I may earn a commission at no extra cost to you.
Materials:
~5.5mm hook
~Yarn Needle for sewing
~Ivory & Maroon plush yarn 5 - bulky
~safety pin or stitch marker
(Any yarn is a good yarn! Be creative!)
Terms:
Sc ~ single crochet
Sc2tog ~ single crochet two stitches together
( )* ~ repeat anything in brackets however many times the number shows following the star
Inc ~ increase stitches by adding two single crochet into one stitch
Whip Stitch ~ in which the needle is passed in and out of the fabric in a series of stitches that circle an edge of the fabric.
Mushroom Stem:
Start with the stem, which will be the bottom!
Row 1: make a magic ring, chain 1, sc 6 times into ring (6)
Row 2: inc*6 (12)
Row 3-4: sc into each stitch around (12)
*Flip inside out and be careful, pull tail tight from the magic ring, knot, and flip right side out again.
Row 5: sc2tog, sc 6, sc2tog, sc 2 (10)
Row 6: sc 2, sc2tog, sc 2, sc2tog, sc 2 (8)
Row 7-8: sc into each stitch around (8)
Lightly stuff the stem. I love using the plush yarn scraps as stuffing! It is so soft.
Row 9: sc 2, sc2tog, sc 2, sc2tog (6)
Row 10-11: sc into each stitch around (6)
Slip stitch into the next stitch, and fasten off yarn. I like to leave about a 5” tail, and make a knot that will sit on the inside of the stem! Poke tail into stem, to hide and give a bit more cushion.
Your stem should now be to this stage!
Just a few more steps and your shroom will be
complete!
Mushroom Cap:
Attach Maroon yarn or the color you chose for your mushroom cap to stem by inserting hook into available stitch and pull through a loop, yarn over and pull through that loop. This does NOT count as a stitch.
Row 1: inc*6 (12)
Row 2: inc*12 (24)
Row 3: (sc, sc , inc)*8 (32)
Row 4: sc into each stitch (32)
Row 5: (sc, sc2tog)*10, sc 2 (22)
Row 6: sc into each stitch (22)
Row 7: (sc, sc2tog)*7, sc (15)
Row 8: sc2tog, sc 14 (14)
Lightly stuff. I only stuff the inner edges of the shroom. That way whenever it is finished I can push down the mushroom cap to get the desired look I want. You can skip this step as well.
Row 9: (sc2tog)*7 (7)
Closing The Hole:
Slip stitch into the next stitch, fasten off yarn. Leave a 7”-10” tail. You should have 7 stitches to work with. Thread your yarn needle by using the 7”-10” tail you left behind. Using a whip stitch, sew into the Front Loop of every stitch around the hole, pull yarn tight, and close the hole. (being careful). Stick your crochet hook through the bottom of the mushroom cap, near the stem, and exit through the top of the mushroom. Grab the Yarn tail and pull all the way through the hole you first entered. Pull the tail so that the mushroom cap pulls down to desired height, once reached, double knot as close to the cap as possible and weave in the tail securely.
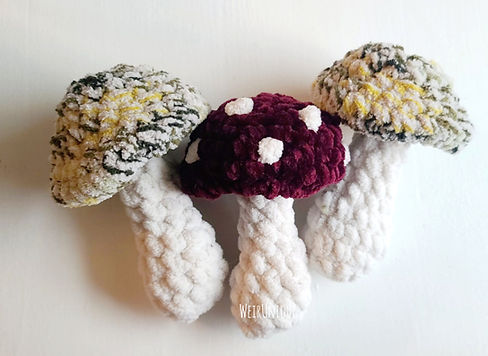
Time to add spots to your Mushroom Cap! (optional)
Use the stem color yarn and attach it to your yarn needle. I try to use one LONG piece of yarn. Sewing will be done on the top layer of the cap, ONLY.
Insert your needle through the bottom of the cap, near the stem, and exit
through the top of the cap. I pull out a lot of extra yarn.
I make a small X with the yarn. Working in the top layer of the cap.
Fill in the gaps to make the X look round. Here is an example of me working on my spot to make it round by weaving in and out on the surface only.
Once satisfied with the shape of your spot, insert the needle through the surface of the spot you were working on and exit about an inch away to create your next spot, and repeat the process for as many spots as you would like! You could even skip the spots! When you are done with your spots, pull your tail near the stem and weave in the ends.
You DID it! Now that it is all done, you get to enjoy your hard work and your little shroom! Some ideas for your mushroom could be stocking stuffers, fillers in gift baskets, sitting on a shelf, riding along in your car, and much more!